Easily mark a large number of orders as shipped, and include the shipping carrier and tracking number if available. You'll be given the option to share the tracking data with backers via email. When preparing to mark orders as shipped, you'll want to first make sure that you have installed the Shipment Tracking app. Click here for help with installing an app. The Shipped Orders File should be ready to be imported. Click here for help with creating the file. Follow the steps below to import the file and mark the orders as shipped.
Importing shipped orders file:
1) Orders.
Click "Orders" from the left menu.

2) Imports.
Click on the "Imports" drop-down found in the top right corner.
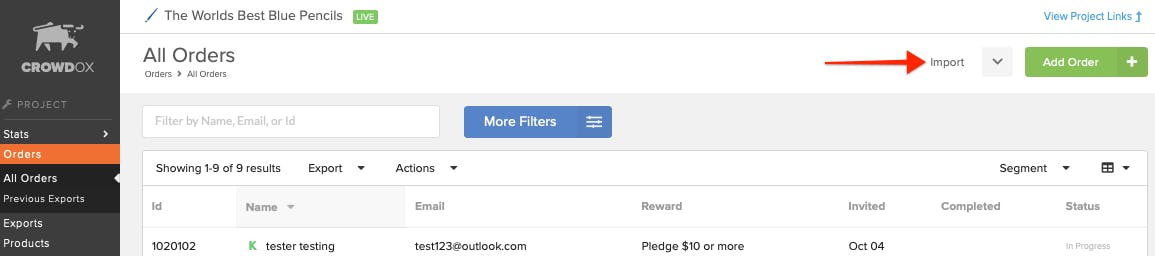
3) Shipped Orders.
Select "Shipped Orders" from the drop-down menu.

4) Upload and Preview.
At the bottom right corner of the details summary, click on "Upload and Preview". A new window will pop-up allowing you to select the created spreadsheet from your computer. Once the file is selected the blue button will change to gray and read "Uploading" as the file is being pulled in. If you encounter an error message at this stage, check the column names used in your spreadsheet. Click here and scroll to the bottom to verify how the column names should be listed. If you continue to run into an error please reach our support team at [email protected].

5) Orders Accepted.
Once the file has been accepted, a new window will show a green checkmark next to the numbers orders that could be identified. A red X denotes a count of orders that could not be located with the information in column A. If you click on the red X it will expand to show you the line numbers within the spreadsheet with an issue. After you've made the necessary changes to your file, you can click on "Try Another File" to upload the updated file.

6) Options: Overwrite Existing Information.
Check the "Overwrite Existing Information" box if you would like the data in the current file to replace any previously imported shipping information. This is most commonly used if you have a list of backers with more than one tracking number.

7) Actions: Send Shipment Confirmation Emails.
Check the box if you would like backers to receive an email advising their order has shipped. If tracking information will be included if imported. Leaving the box un-checked means backers will not be emailed about their order shipping.

8) Process Now.
Once all of the orders are successfully located, click "Process Now" to start the import. If you are electing NOT to send emails, skip to step 10.

9) Preview Email.
You are given a generic preview of the shipment email that the backers will receive. Because this is a generic version of the template, the shipping method and tracking number are not included in the preview. If changes are needed to the template, you'll need to edit the email. Click here for help with updating email templates. If all looks well, click the green Process Now button in the bottom right corner.

10) Close.
Once successfully uploaded, you'll have the option to "Close" the window in the bottom right corner.

11) Double-check.
Check a few of the orders to ensure they are locked as shipped, and any uploaded tracking data is showing. Depending on the number of orders in your import, the emails can take a few minutes to go through. You can still view the shipment email directly from the backers order by clicking on the grey envelope to the right of the email.
